Lots 1-9 Lots 10-18 Lots 19-27 Lots 28-36 The Quest for a Good Donkey Photo! Home
"THE QUEST FOR A GOOD PHOTO"
by Mary Nisson A proper picture means a lot in promoting our donkeys. This article will hopefully help you get a great photo & will change the way you you look at photos! The most important photo to access conformation, preserve for posterity & use for registration identification is the broadside, so that is the only view we will address.
TIME OF DAY Earlier in the morning, or later in the afternoon. The colors will show truer & brighter. Shadows on the body show less. (High noon is the worst, except in winter when the sun is lower in the sky all day!) SUN should be BEHIND the photographer - NOT behind the DONKEY. (NOTE: With our better quality digital camera with automatic light adjusting feature we have been able to take photos on a cloudy day or totally in the shade, where there is nothing bright in any part of the photo – as long as camera is in the same shade area & NO sun hits the lens, and still get colors to be true, some have seemed even better than those in the sun.)
BACKGROUND should be free of "clutter" & contrasting to the donkey's color. Grass & blue sky is best, but other things will work - dark bushes if not too close (& out of focus better yet) with a lighter colored donkey.
EQUIPMENT a 35mm camera with a 110mm lens is ideal, or if you have a digital, back up & then use the zoom to get a closer view of the donkey. If your lens power is less, say 55mm, positioning properly is absolutely critical or you get a distorted donkey - big head, little butt - short legs, big body, ect.
POSITIONING The photographer should be centered at a 90 degree angle to the donkey, & THEN take one step parallel toward the rear of the donkey. The CAMERA HEIGHT should be the same as the middle of the rib area. Remember to center & fill the photo - not too close or distant with your subject.
POSITIONING the donkey - should be broadside to the photographer. The ground where the front feet are should be 1"-2" higher than the hind legs if possible, but level will work. The head should be up & slightly turned toward the camera so that the forehead can just be seen to give a nice dimensional look. Ears up. Legs - near side front & back should be positioned so that a plum line hangs from the shoulder & rear. The legs on the back side should be set to show inside of the near hind & front legs, with space visible between them no higher than the hock & knee.
TIPS Don't be discouraged if you don't get everything perfect, that's difficult! The best photos are generally done in the first 5-10 minutes while the donkey is fresh. Ideally it takes 3 people to get great photos - the photographer, the handler & a positioner to help set the legs & then get the ears up at the right time. Getting "correct" photos of a donkey as a pasture shot takes much time & patience for the perfect one to "happen", so I don't expect as much "perfection" in that, as a donkey being "posed" & held.
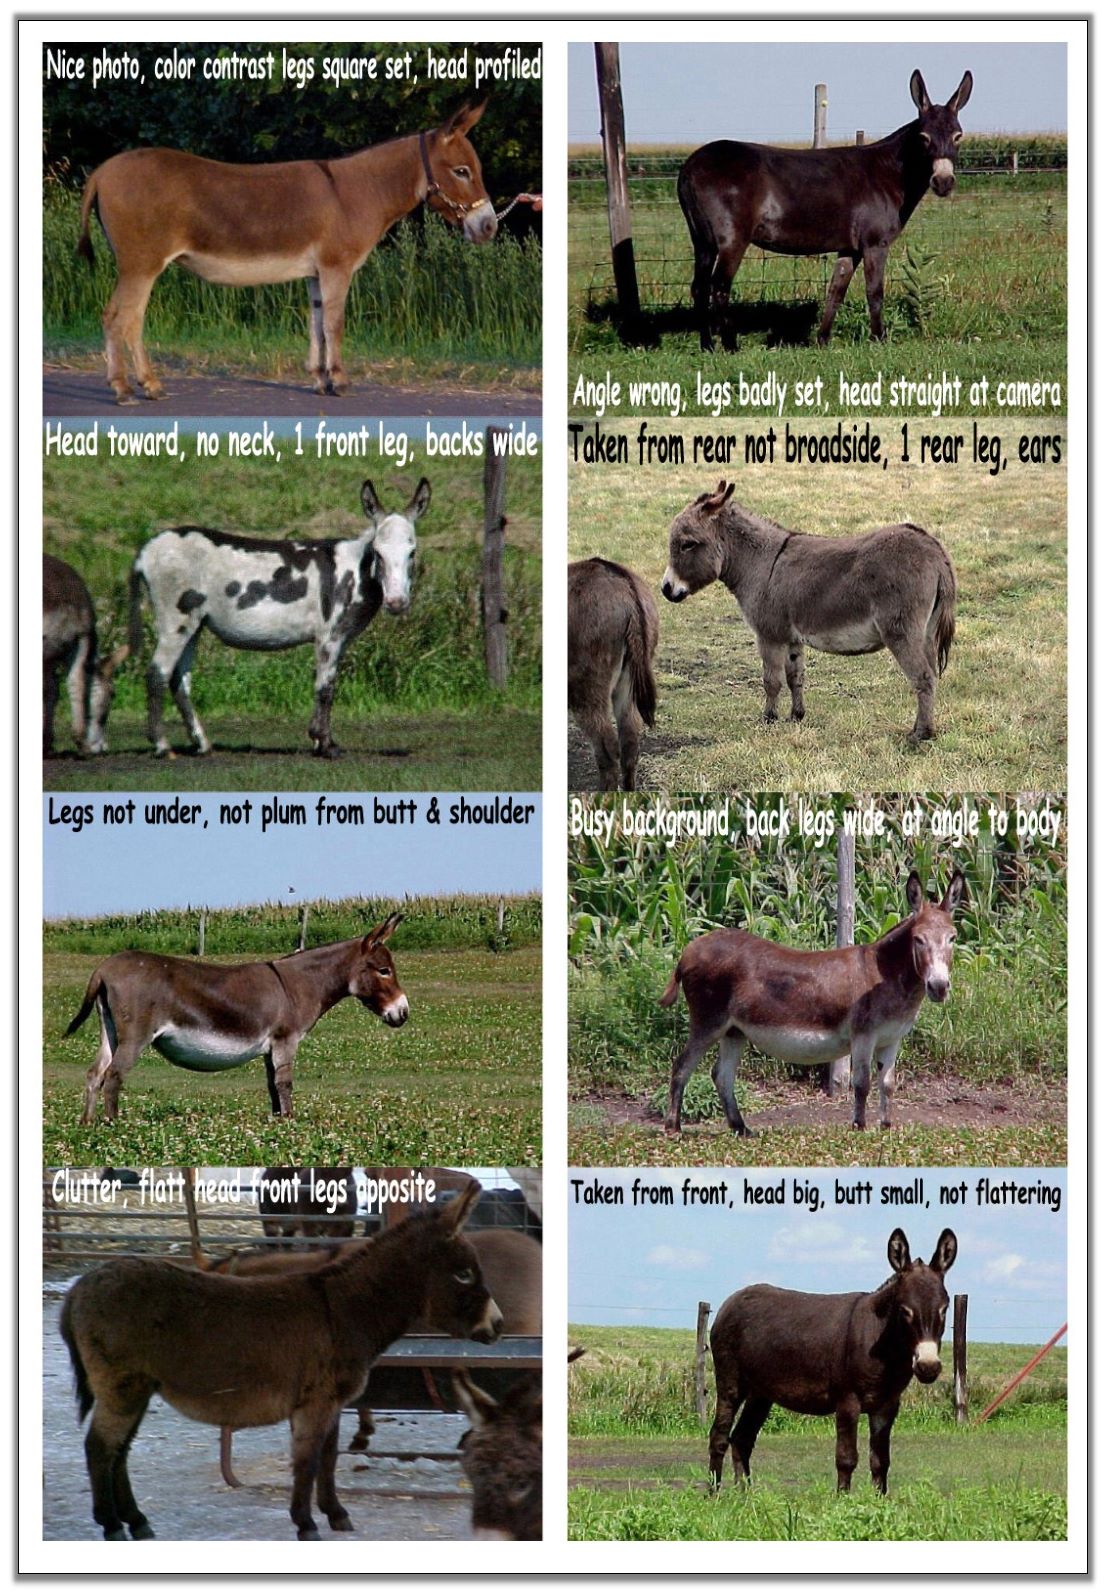
Examples - See photo examples below of 8 donkeys with notes.
(Click photo to enlarge)
(Click photo to enlarge)
Nissen's LN Ranch
1080 Highway 17
Corwith, IA. 50430
(Located on State Highway 17, 5 miles North
of Renwick or 6 miles South of Corwith)
Telephone #641-494-8291
E-mail nissens@wmtel.net
Lots 1-9 Lots 10-18 Lots 19-27 Lots 28-36 The Quest for a Good Donkey Photo! Home
You are visitor number

since 7/29/22
Last Updated:
Web Design by Dayle Haworth
Copyright © 2022 ~ Nissen's LN Ranch ~ All Rights Reserved